LOCKSS and SSL
To get back to the Classic LOCKSS system manual use this link
Overview
This document takes a look at the steps needed to secure the LOCKSS admin interface with an InCommon SSL Certificate. The examples in this document were done on CentOS 7 with OpenJDK version 8 (java).
Getting Started
The first thing you must do is gather information regarding your server and your organization. This information is used to create the Keystore and Key pair, which is then used to create a CSR (Certificate Signing Request). Below is a picture of a chart used to gather this information. Some of the fields have recommended values prepopulated.
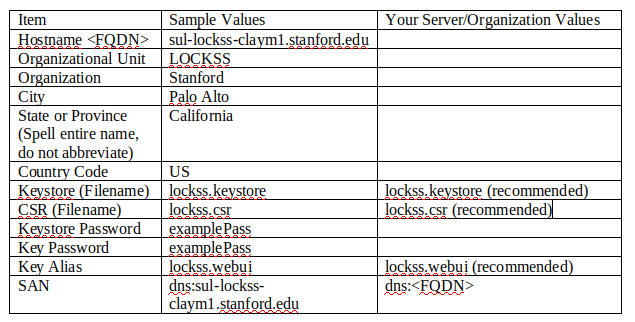
Please do NOT use “examplePass” as your Keystore and Key password. It is only shown here as an example. However, We do suggest keeping the Keystore password and the Key password the same for simplicity (You could make them two different passwords if you choose, or if your organization suggests doing so).
Prepare your working Directory
First, you must create a place to create a Keystore, and eventually generate a CSR. In this example, we will use the directory /root/ssl which must be created. Log into your LOCKSS box, gain root access, and create the /root/ssl directory using mkdir.
[root@sul-lockss-claym1]# mkdir /root/ssl
[root@sul-lockss-claym1]# cd /root/ssl
[root@sul-lockss-claym1 ssl]#
Generate the Keystore and Key Pair
The keytool command is used to generate the Keystore and the Key pair. Below is a template illustrating how keytool is used. Each variable (word preceded by “$”) will be replaced by the values we noted earlier.
keytool -genkeypair -noprompt \    # Tells keytool to generate keypair
  -keystore $KEYSTORE \            # Sets the keystore name
  -storetype jceks -alias $ALIAS \ # Sets the keystore type and assigns an alias
  -storepass $PASSWORD \           # Sets the keystore password
  -keypass $PASSWORD \             # Sets the key password
  -keyalg RSA -keysize 2048 \      # RSA algorithm used to create key of size 2048
  -dname "CN=$HOST, OU=$UNIT, O=$ORGANIZATION, L=$CITY, S=$STATE, C=$COUNTRY" \
  -ext SAN=dns:$HOST               # Subject Alternative Name useful in X.509 cert
Be sure to substitute the variables with the values you gathered regarding your server and organization. Using the example values we gathered at the start of this document, our command would be
keytool -genkeypair -noprompt \
  -keystore lockss.keystore \
  -storetype jceks -alias lockss.webui \
  -storepass examplePass \
  -keypass examplePass \
  -keyalg RSA -keysize 2048 \
  -dname "CN=sul-lockss-claym1.stanford.edu, OU=LOCKSS, O=Stanford, L=Palo Alto, S=CA, C=US" \
  -ext SAN=dns:sul-lockss-claym1.stanford.edu
The output from the above keytool command is the Keystore file containing the name “lockss.keystore” that we specified above. We can use ls to verify that it is there.
[root@sul-lockss-claym1 ssl]# ls
lockss.keystore
Generate a CSR Using Your Newly Generated Keystore
Now that we have our Keystore and Key Pair, we must use the keytool command to generate a CSR. The contents of the CSR will be copied and pasted into the certificate request page for the InCommon certificate. We will skip explaining this command in great detail and show you our keytool command using the example values from earlier.
The only values that should be different on your keytool command would be the password values, and the SAN value
keytool -certreq -noprompt \
  -keystore lockss.keystore -storetype jceks -alias lockss.webui \
  -storepass examplePass -keypass examplePass \
  -ext SAN=dns:sul-lockss-claym1.stanford.edu \
  -file lockss.csr
The ls command now shows us two files.
[root@sul-lockss-claym1 ssl]# ls
lockss.csr lockss.keystore
Request the InCommon certificate
Using a web browser navigate to the InCommon SSL Certificate request form that your institution recommends and fill in the appropriate information.
IMPORTANT - LOCKSS is a Java Web Server. You must specify the “Server Type” as “Java Web Server (Javasoft/Sun)” on your InCommon SSL request form.
Paste the contents of your CSR file into the appropriate spot. Use the cat command to view the contents of the lockss.csr file, and then use your mouse to highlight everything within the CSR. This includes the lines “—–BEGIN NEW CERTIFICATE REQUEST—–” and “—–END NEW CERTIFICATE REQUEST—–”.
[root@sul-lockss-claym1 ssl]# cat lockss.csr
-----BEGIN NEW CERTIFICATE REQUEST-----
MIIDGzCCAgMCAQAwezELMAkGA1UEBhMCVVMxCzAJBgNVBAgTAkNBMRIwEAYDVQQH
EwlQYWxvIEFsdG8xETAPBgNVBAoTCFN0YW5mb3JkMQ8wDQYDVQQLEwZMT0NLU1Mx
JzAlBgNVBAMTHnN1bC1sb2Nrc3MtY2xheW0xLnN0YW5mb3JkLmVkdTCCASIwDQYJ
KoZIhvcNAQEBBQADggEPADCCAQoCggEBAL9e1Ol35aMF9V7LOfvCIqZBgRquTkDl
0gjNO6v4E/R/zAGYtsPtRooURBtw9jY1uIuTL+ftBSi0pXKVK+4iheQfMkRHuZZW
/W36SL+JWNAmkKN8f0kPIgioUtkTqm0Ei8m7U6XOK5eIDm3jMyXVgSABt3Dt0Iq+
Yer2smrlB3Gak1wTF0XDOS3B7Kf1Ash7Nqci3rxnRPiX/dJXZ64DvyOsaogMzZEL
TgU3Z/q8CTt0GMlp7pL4zze0SBXpyJMSNQqZdaR7Fwa9d9O+pg2vfgJYEQVL/1RZ
Aa44odS5XNn0LZTiXZl3S8Owxgt4HXwlVLT9Emvq1WxE7OJa/ybsLIcCAwEAAaBb
MFkGCSqGSIb3DQEJDjFMMEowKQYDVR0RBCIwIIIec3VsLWxvY2tzcy1jbGF5bTEu
c3RhbmZvcmQuZWR1MB0GA1UdDgQWBBR8D5EuDRKcJWo0XUkjg3Izz44GrDANBgkq
hkiG9w0BAQsFAAOCAQEAEM4jNFQyT1+jNg3c3XDMx+RMaVhkvBsbpfMlJ5LAQV+k
S7wRiBM+6JqrBehprpLwfDLkKaTAihz9KT7ya8vVmVV9EUrY3TQL0pXWbBz6bCDl
gfJu5ofYfLHSV9MgH6g5koegNVp9LSM/rE8P9O/vIAkKKMwQs1OyXhUcOHcglVlD
w+GzEH1dYXY/VGMMwts1TQIQORkoQTlnxkhkqB+t9M81KQnsNFuN1J1fMKlAbzwN
cjoE0YZR9rgEUfP5XuCAbAOFEzYNxm1Cq3VIYBOP+MtCfsQr0Jwctc62fPo6I4zr
FFX6iQktA68D7gleg7wxH/3vILzjhIIAZl8o04PJpA==
-----END NEW CERTIFICATE REQUEST-----
Download the Server, and Intermediate Certificates Using Curl
Incommon will send you an email containing URLs to your certificates. There may be multiple URLS and certificate types but we only want the X.509 certificates (Usually the first two in the email).
The first X.509 certificate is the “server certificate”, and the second one contains the “intermediate” and “root” certificates.
Instead of downloading the certificates to your machine and transfering them to the server, we recommend using curl from the server to download the files.
[root@sul-lockss-claym1]# cd /root/ssl   #if not already there
[root@sul-lockss-claym1 ssl]# curl -o server.cert "<server cert URL from email>"
[root@sul-lockss-claym1 ssl]# curl -o other.cert "<intermediate cert URL from email>"
You will now have a server.cert file and a other.cert file in your working directory
[root@sul-lockss-claym1 ssl]# ls
lockss.csr lockss.keystore other.cert server.cert
Split “other.cert” Into Two Certs
Important - Now that we have our certificates from InCommon, we have to import them into our keystore using the keytool command again. The only issue is that keytool is only capable of importing one certificate at a time.
As we mentioned, our newly downloaded certificate “other.cert” contains a root certificate, and multiple intermediate certificates. Using cat you can see all three certificates delineated by the strings “—–BEGIN CERTIFICATE—–” and “—–END CERTIFICATE—–”.
[root@sul-lockss-claym1 ssl]# cat other.cert
-----BEGIN CERTIFICATE-----
(certificate information deleted from this example for brevity)
(certificate information deleted from this example for brevity)
-----END CERTIFICATE-----
-----BEGIN CERTIFICATE-----
(certificate information deleted from this example for brevity)
(certificate information deleted from this example for brevity)
-----END CERTIFICATE-----
-----BEGIN CERTIFICATE-----
(certificate information deleted from this example for brevity)
(certificate information deleted from this example for brevity)
-----END CERTIFICATE-----
The first certificate listed in “other.cert” is the root certificate which we do not need because there is already a root certificate that is installed with OpenJDK (Java).
We need the second, and the third certificate within our “other.cert” file as they are the intermediate certificates.
Just as we did when generating the CSR, use the cat command to view the contents of “other.cert”, and then copy and paste the middle certificate into a new file called “intermediate1.cert”. Now copy and paste the third certificate into a file named “intermediate2.cert”. Be sure to include the “—–BEGIN CERTIFICATE—–” and “—–END CERTIFICATE—–” portions of the certificates.
Our working directory should now contain the following.
[root@sul-lockss-claym1 ssl]# ls
intermediate1.cert intermediate2.cert lockss.csr lockss.keystore other.cert server.cert
[root@sul-lockss-claym1 ssl]#
[root@sul-lockss-claym1 ssl]# cat intermediate1.cert
-----BEGIN CERTIFICATE-----
(certificate information deleted from this example)
-----END CERTIFICATE-----
[root@sul-lockss-claym1 ssl]#
[root@sul-lockss-claym1 ssl]# cat intermediate2.cert
-----BEGIN CERTIFICATE-----
(certificate information deleted from this example)
-----END CERTIFICATE-----
Import Certificates into Keystore
Important - Importing the certificates permanently alters the keystore. This means that if the keystore becomes corrupted you will have to restart this entire process. We highly recommend making a copy of your keystore by doing the following.
[root@sul-lockss-claym1 ssl]# cp lockss.keystore lockss.keystore.bak
Once you have made a backup of your keystore we can begin importing the certificates. We will start with the intermediate certificates, and import the server.cert certificate last.
Import the first intermediate certificate using the following. (Your “storepass” value and “SAN” value will differ)
[root@sul-lockss-claym1 ssl]# keytool -import -trustcacerts \
  -file intermediate1.cert -alias intermediate1 \
  -keystore lockss.keystore -storetype jceks \
  -storepass examplePass \
  -ext SAN=dns:sul-lockss-claym1.stanford.edu

Certificate was added to keystore
Now we import the second intermediate certificate. (Your “storepass” value and “SAN” value will differ. Also note the change in the alias from the the previous command and this one.)
[root@sul-lockss-claym1 ssl]# keytool -import -trustcacerts \
  -file intermediate2.cert -alias intermediate2 \
  -keystore lockss.keystore -storetype jceks \
  -storepass examplePass \
  -ext SAN=dns:sul-lockss-claym1.stanford.edu

Certificate was added to keystore
Finally we import the server certificate “server.cert”. (Your “storepass” value and “SAN” value will differ. Also note the change in the alias from the the previous command and this one.)
[root@sul-lockss-claym1 ssl]# keytool -import -trustcacerts \
  -file server.cert -alias lockss.webui \
  -keystore lockss.keystore -storetype jceks \
  -storepass examplePass \
  -ext SAN=dns:sul-lockss-claym1.stanford.edu

Certificate was added to keystore
Install the “lockss.keystore” File
We can now install the lockss.keystore file by copying it to /etc/lockss/. We must also change the permissions of it so that it is readible by the lockss linux ID.
[root@sul-lockss-claym1 ssl]# cp lockss.keystore /etc/lockss/
[root@sul-lockss-claym1 ssl]# chmod 444 /etc/lockss/lockss.keystore
Create the LOCKSS SSL Configuration File
Create the file /etc/lockss/adminssl.txt and input the following contents.
We will be replacing the values that are preceded with a “$” with the values that we collected previously. We will be inserting the keystore alias twice, the keystore filename, and the keystore password.
org.lockss.accounts.policy=ssl
org.lockss.ui.sslKeystoreName=$KEYSTOREALIAS
org.lockss.keyMgr.keystore.ks1.name=$KEYSTOREALIAS
org.lockss.keyMgr.keystore.ks1.file=/etc/lockss/$KEYSTORE
org.lockss.keyMgr.keystore.ks1.keyPassword=$KEYSTOREPASSWORD
Using our example values, our adminssl.txt file would contain the following.
[root@sul-lockss-claym1 ssl]# cat /etc/lockss/adminssl.txt
org.lockss.accounts.policy=ssl
org.lockss.ui.sslKeystoreName=lockss.webui
org.lockss.keyMgr.keystore.ks1.name=lockss.webui
org.lockss.keyMgr.keystore.ks1.file=/etc/lockss/lockss.keystore
org.lockss.keyMgr.keystore.ks1.keyPassword=examplePass
Modify LOCKSS Startup Options
The adminssl.txt file must be added to the LOCKSS startup configuration. This is done by appending -p /etc/lockss/adminssl.txt to the LOCKSS_PROPS_URL setting in “/etc/lockss/config.dat”. Open the file “/etc/lockss/config.dat”, and ensure that the entire string is between the double quotes.
Before
LOCKSS_PROPS_URL="http://props.lockss.org:8001/daemon/lockss.xml"
After
LOCKSS_PROPS_URL="http://props.lockss.org:8001/daemon/lockss.xml -p /etc/lockss/adminssl.txt"
Restart LOCKSS and Login
Restart LOCKSS wih systemctl restart lockss and view the output of /var/log/lockss/daemon. If there is an issue with the configuration, there should be an error and stack trace within the first 60 seconds.
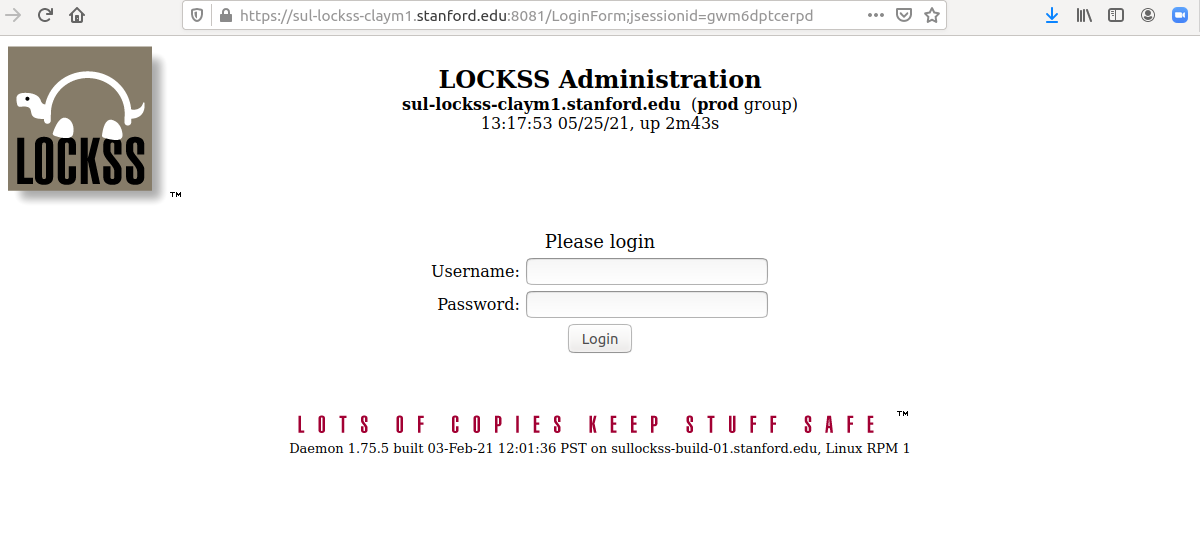
If there are no obvious errors, try to access the URL of your LOCKSS box, but this time using the prefix “https” rather than “http”. Using our example, I would navigate to “https://sul-lockss-claym1.stanford.edu:8081”.
The login dialog with an SSL certificate is different from what you have seen before. Instead of a browser-supplied authentication window you’ll see a LOCKSS-supplied Login screen that looks like this: